If you have heard of the Cricut craft machine, or indeed, machines, but are not quite sure what they are or how to use them, you’ve struck gold. This is a long and comprehensive article about the Cricut Maker 3 and about Cricut machines in general.
Do get yourself a cup of coffee or tea though as you are about to embark on a long read with heaps of lovely photos. Settle in and by the time you finish, you will know whether you’d like to try a Cricut craft machine for yourself.


But first, meet the very crafty writer who has reviewed the Cricut Maker 3 for Hello Sydney Kids.

Amy Bingham is a creative addict. A writer and video producer by day, she spends weekends crossing her fingers for rain, so she can sew, make, craft, solder, build and create, free from guilt and the judgemental gaze of her husband. She is mum to two twenty-something-year-old daughters and a needy Italian Greyhound called Pip.
One of Amy’s proudest moments was visiting her daughter’s new home and realising the table dominating her new bedroom was actually a crafting table with half a dozen works-in-progress on display. Amy is racing towards stopping work and spending more time on her creative endeavours.
Amy writes: Let me start with a confession. In spite of the fact that I am a serial maker and my kitchen table has layers of glitter embedded in its grain from years of “make and do” with my now adult daughters, I’ve always been quite content to go old school, relying on scissors, glue and a ruler for creative endeavours.
That was, until a friend dragged me to the Sydney Craft show earlier in the year. And across the exhibition hall I spotted a crowd around a nifty machine I inadvertently thought was called a Cry-cut, and I realised I had a crush. How cool is that machine?
But it wasn’t until a few months on, when I was given the opportunity to road test one of those craft machines – which I quickly learnt was pronounced more like cricket – that my crush turned into a full-on love affair.
And after just over two months of experimenting, testing and playing with my first Cricut machine, I’m ready to report all the tips, tricks and insights I’ve picked up by spending time with my crush.
So, if you’re on the fence about whether to buy one for yourself, – or maybe like me only a few short months back, you’ve never even heard of a Cricut – then keep reading. Wherever you are in your Cricut journey, I hope that after you’re done reading this post, you’ll have all the deets necessary to decide if a Cricut is the right choice for you or not.
What is a Cricut craft machine?
A Cricut is an electronic cutting machine that cuts and prints designs using heaps of materials: paper, sticky vinyl, cloth, card and iron-on transfers. Depending on what machine you end up using, you may even be able to cut balsa wood, fabric and leather.
It means you can create all manner of designs for cards, stickers, t-shirts, labels, wall decals and everything in between.
And yes, you absolutely can do that kind of things yourself with scissors and a craft knife. But, believe me, the Cricut does it neater and faster, delivering instant and professional results almost every time.
There are also a whole bunch of accessories and tools to make the do-ing easy. And thanks to its inbuilt design software (more of that later) there are plenty of templates, shapes and projects, to give you inspiration.
Chuck in an active and creative Cricut community – particularly on YouTube – where you can seek out advice, tips and inspo – and this is far more than just a cutter, it’s creative nirvana!
How the Cricut craft machine works
It’s not rocket science, but at the beginning it helps to have an idea of the key steps, no matter what you’re making.
Firstly, on your computer, phone or tablet upload your own design or create in Cricut’s Design Space software or customise an existing template.
Then, send your design from your computer to your Cricut wirelessly.
Next choose your material – vinyl, fabric, paper, cardboard. You can put it on a Cricut mat which holds the material firmly in place when cutting. There are various different mats – some stickier than others – and some designed for specific materials, eg fabric. Or if it’s vinyl, card or paper, Cricut creates these in fit-for-purpose rolls that can be loaded direct into their machines.
Once your material is loaded (and you tell the machine what your material is), you can choose different blades to suit (eg for cutting fabric, paper, wood, metal etc) and if you’ve loaded up any necessary pens, you can set it to print.
And when the cutting (and printing) is complete, remove that mat or material and use the material as you wish.
What Cricut machine is right for you?
There are a few different types of Cricut machines and at the time of writing there are three on the shelves here in Australia, with plenty of older/discontinued versions still in use and available second-hand.
The Cricut Joy is an entry-level machine, compact and highly portable. Given that it can only cut materials up to 14 centimetres, it’s suitable for small projects, although Cricut make vinyl rolls up to 6 metres long. You can cut up to 50 materials and also print and write with pens and you can also use a card mat, loading up pre-cut cards for printing, cutting and so on.
(We do also have a review of the Cricut Joy machine by me, Seana, a not-very-crafty person, here.)

At a cost of around $280, the Cricut Joy is best for occasional or beginning crafters who want to make cards, print small stickers or vinyl shapes or small iron-ons.
Next up in capability and price, is the Explore, currently on its 3rd iteration, the Explore 3. It’s apparently Cricut’s most popular model and offers more variety in terms of project width size than the Joy and more material and blade options. Cleverly it also can score rather than cut – good for folds – and can add foil embellishments to projects.
It retails for about $450 and suits crafters and creatives who can utilise its enhanced functionality.
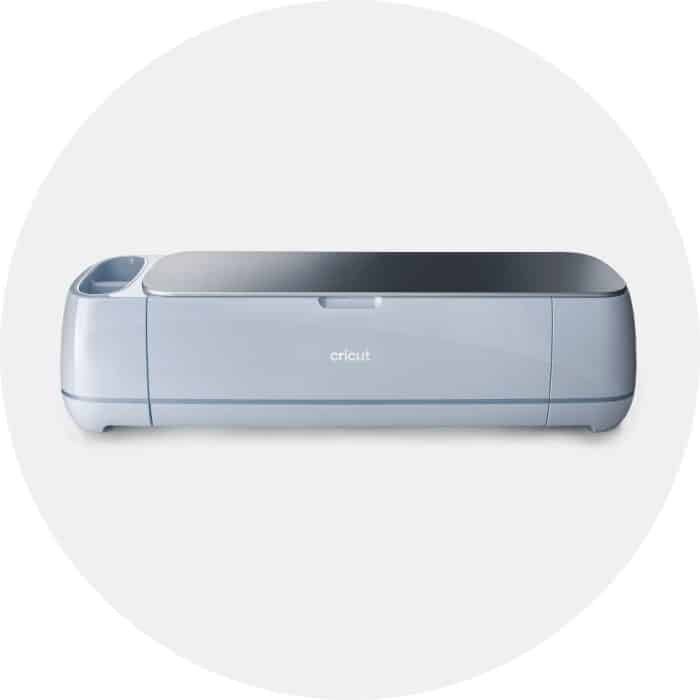
For those wanting to supercharge their creative endeavours, the Maker 3 is your machine.
With 12 blades (which you have to purchase separately) to cut, score and embellish up to 300 different materials, the Maker 3 does everything the Explore 3 does, but can cut thicker or more delicate materials like leather, thin woods and fabrics.

Like the Explore it uses smart materials – perfect-sized Cricut branded rolls of vinyl and paper that can be loaded direct into the machine rather than adhering to a mat – but the Maker cuts and prints with more force and faster than its little siblings.
At around $699 it’s a far higher cost. But if you have more complicated projects, a need for cutting a different bunch of materials and want a machine that is far more versatile, then it’s a goodie.
It’s also the one I tested and have fallen in love with, so my creations in the coming examples were all made using a Maker 3.
When deciding which is the right machine for you, consider what it is you need it to do and what your budget is, and choose the best fit.
Remember too that it’s not a one-off investment. You may need to buy more tools and accessories (see later) and you’ll certainly have to buy material to cut, so take that into account too.
If you’re a once-off crafter then stick with scissors and a craft knife. But if you want to make cards and t-shirts regularly, signs for decals for work or home, have young people (how I wish I had a Cricut 15 years ago when my kids were in primary school) then get yourself a Cricut. You won’t regret it!
Shop around for the best prices online and in-store although you will usually find that Cricut craft machines are fairly similarly priced wherever you shop.
Are Cricut machines easy to use?
The short answer is initially no.
It took me several hours of fiddling, research and going down the YouTube rabbit hole before I got confident with the software, hardware and process. But I quickly lost my overwhelm, gave it a go and soon got addicted.
Downloading Cricut’s Design Space software and connecting your machine via Bluetooth to your device (in my case a Mac Pro) is easy, but designing and using the software not so much.
As a big fan of Canva and Photoshop, at first Design Space didn’t feel intuitive to me and I was a little overwhelmed. There are some new terms to learn – weld, contour and slice – which didn’t make sense at first.
However inserting shapes and customising designs, manipulating images and shapes, changing sizes and scale, layering/arranging, grouping and detaching layers, flipping and moving was pretty easy to work out.
I’ll be honest, cutting mistakes were made and materials wasted – frustratingly – but I pushed on!
I loved the videos on the Cricut YouTube channel. Not only do they look beautiful but they’re super helpful and well-organised. And of course, everyone who’s bought a Cricut seems to also be an expert – there are hundreds of videos by Cricut fans.
That said, the Cricut community is crying out for more Aussie-made videos – both from a Cricut organisational hub and from local crafters: it’s all dominated by Americans, not surprisingly. But what is there is super useful, particularly when you’re starting out.
Cricut Design Space
If you’re creative or are a designer, then you can use your usual go-to software to create your designs. Simply export finished projects as SVG files and import them into Cricut’s Design Space ready to cut.
But if you love the idea of being a designer and are – like me – a bit average, then Design Space is your friend. There are heaps of pre-loaded templates, shapes, text and phrases that you can use for your designs or designs and projects that you can use – some free and some for a small fee – and customise.
I signed up to Cricut Access which for a monthly fee allows you to use thousands of Cricut Community Projects, fonts and design elements. This is awesome when you’re starting out, as if you want to make something specific, there is likely someone else in the Circuit Community has who done it before and uploaded the design. Sometimes you have to pay more for a design than the monthly fee which I find a bit much, but I understand people want to make money from their designs. On YouTube, there are lots of makers who enable you to download their designs in return for your email.
I ended up discontinuing Cricut Access after a couple of months, although when you sign up it rolls over each month unless you actively unsubscribe and stop payments which is normal, but frustrating.
Cricut machines come with a thorough online manual and there are a lot of other Cricut resources online, so they are fairly easy to learn how to use. Design Space and the Cricut machine itself are both designed to be very user-friendly.
You don’t need lots of graphic design experience to use them (though it does help if you want to create your own designs from scratch).

What can Cricut craft machines make?
With several birthdays coming up and a supply crisis in my card drawer, greetings cards seemed like a safe and achievable project to start my Cricut making.
There are plenty of awesome templates on Design Space and many iterations that the community had customised that I liked.
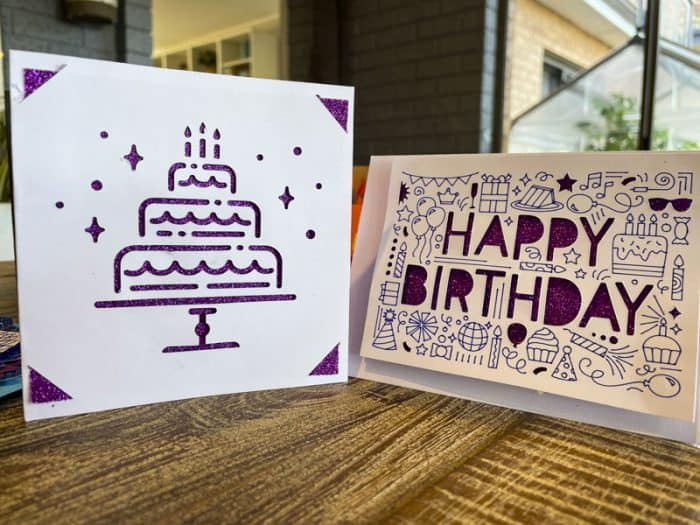
I thought it best to road-test the cutting ability of my Cricut and experimented with various cut-out designs of various sizes using patterned and glitter backings.
The pink one below uses one of the Cricut insert cards with holographic backing card, but I used plain card and coloured card for a Father’s Day card which I think was just as professional looking.
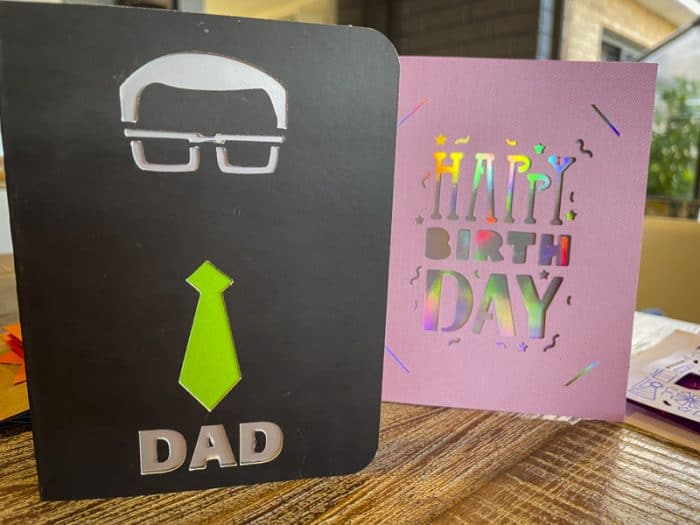
My daughter made a rude card for a friend’s 21st that she’d seen on a market stall that morning (so not her copyright!) before deciding on something more traditional.

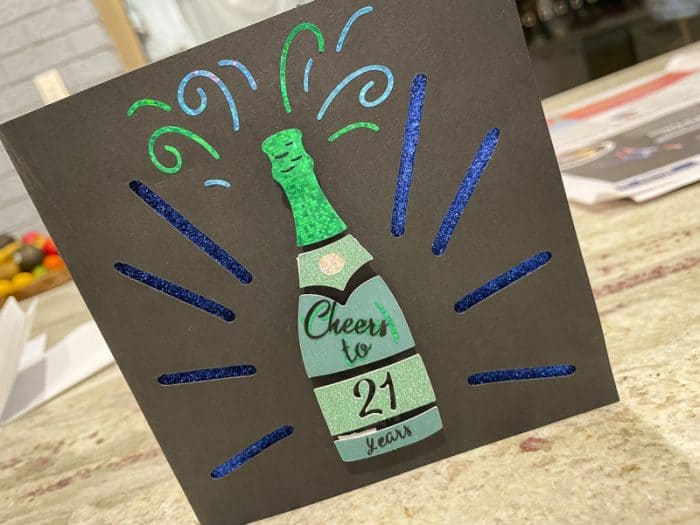
We both enjoyed cutting layers to build 3D shapes using sticky dots to stick them together. Cricut makes it super easy – telling you when to put in a new colour of paper (or card) and how to assemble it. I was pretty pleased with these – they look very pro!

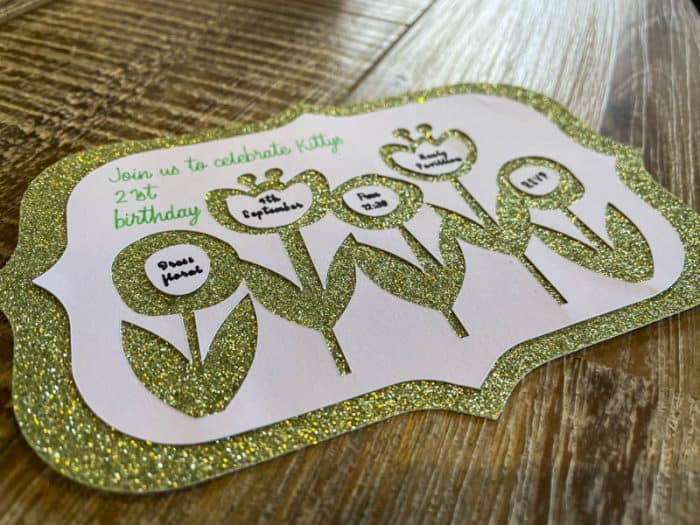
As it was 21st birthday party season amongst my daughter’s peer group, I also experimented with party invitations. The text on this one was probably a bit too small for the thickness of the pen. I do like a bit of glitter – can you tell?

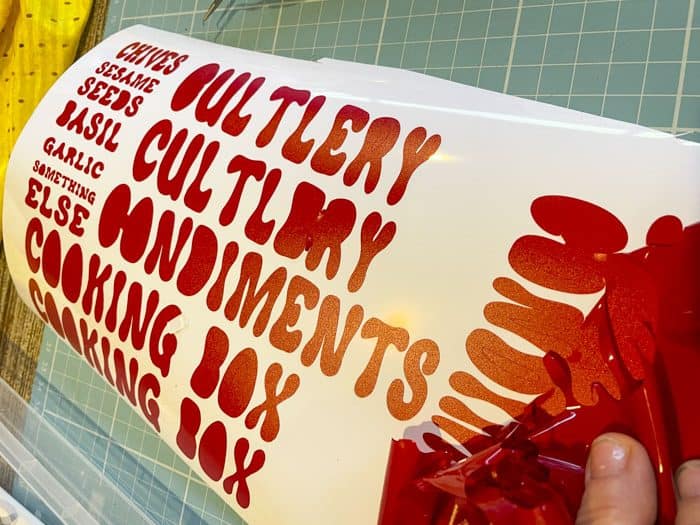
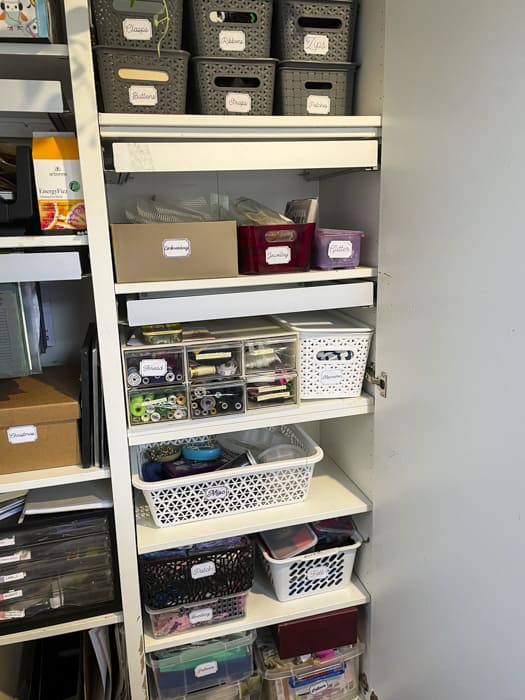
Making viny labels with a Cricut machine
My spice cupboard got a makeover, closely followed by the camping boxes.
I love love love using the weeding tool to peel off the excess vinyl – it really is very satisfying.
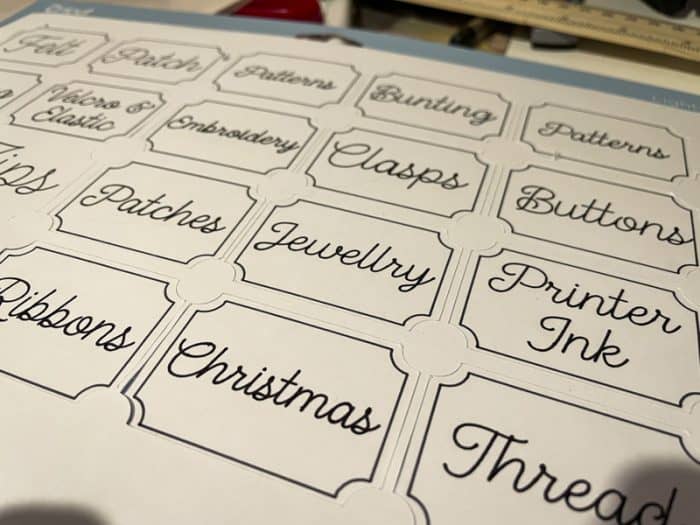
Next up my craft cupboard needed some organisation.
I looked everywhere for printable vinyl – but in the end, used some Avery full-page labels, and chose a twirly font to reflect my creative bent. It’s made everything far easier to locate quickly – although the labels won’t be nearly as long-lasting as the vinyl ones in the spice cupboard.
A work conference coming up required some nifty work shirts for our team. I made up the text and layout in Design Space.
After a few mistakes, I learnt that you have to mirror the image on any vinyl, so that when you stick it to its final destination it doesn’t read backwards. Obvious once you think about it, but easy to forget.
Last time we had these printed professionally and the polo shirts and sweatshirts they gave us were a funny fit. This time the team were able to try on and buy their own shirts and I printed off the text to fit each different-sized shirt perfectly.
A Cricut heat press not only offers consistent heat across its surface area, but through its handy online Heat Guide you can select both your heat-transfer material and your base material and dependent on the easy press you have, gives you a recommended heat time.
Of course, I only had an iron, a tea towel and an ironing board. After a fair bit of YouTubing, I worked out that baking paper was a good barrier between the material and heat source, and worked out the optimum heat time and they turned out well.
Well sort of. For my first effort, I tried to peel off the transfer below it had cooled – big mistake, but the second attempt and beyond were perfect.
Using fabric in a Cricut craft machine
With my confidence at an all-time high – nailing this Cricut thing – time to focus on cutting fabric, a big test for me. I regularly create multiple versions of projects – bags, bunting and patchwork – and cutting by hand is laborious – hugely time-consuming and hard on the hands. Would the Cricut be able to make my sewing projects more efficient?
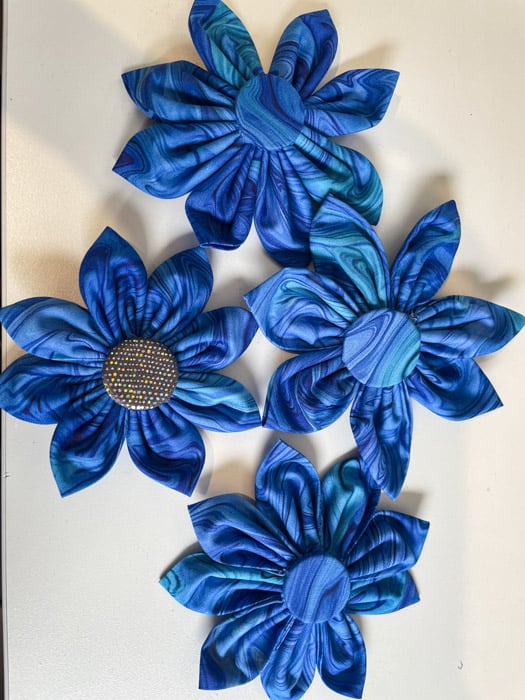
A quick request from my choir mates – would I make a bunch of fabric flowers for us to wear during our weekend performance? – was just the challenge I needed.
Having dug out a few fabric options – plain blue silk, shimmery spandex and patterned cotton from my scraps box – and with a new sticky pink fabric mat and rotary cutting blade installed, I set to work.
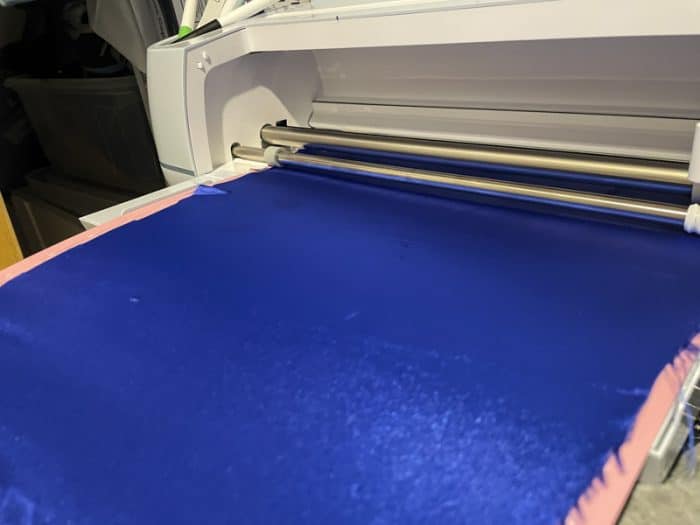
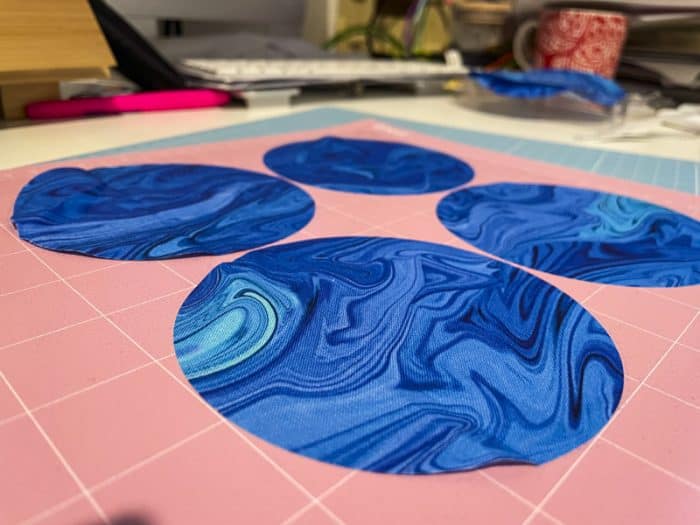
The silk and the spandex were a bit too challenging for the Cricut, but the cotton circles printed perfectly. And in no time the flowers were assembled, sewn together and five new show-ready flowers were delivered the next day.
I love how Cricut enables you to adjust the fabric settings before you cut – with a long list of potential choices, cotton, polyester, felt and so on. This then adjusts the pressure of the blade accordingly and I am sure with more time to experiment I would have worked out a workaround for the silk and spandex materials too.
Having found some leftover felt in the craft cupboard (now handily labelled “felt” thanks to Cricut – see above!), I discovered the more rigid and less slippy the material, the more it adheres to the pink sticky mat and the cleaner the cuts.
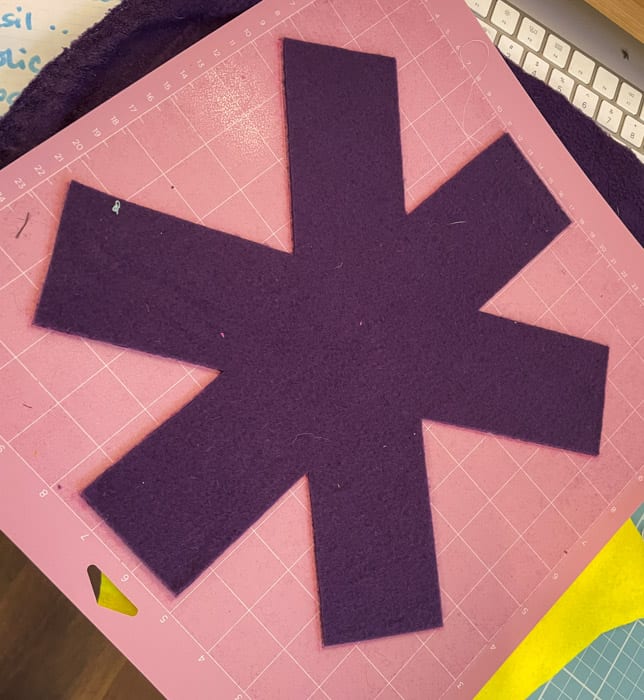

Cue some very hand pot protectors for the saucepan drawer which I probably should have made when I first bought the pots, but it was all too much of an effort. Thanks to Cricut – projects like these are now fast and effortless; although I don’t like the felt marks left on the sticky mat this time around!

Cricut craft machine tools and accessories
Cricut machines are capable of many things, and there’s a myriad of additional tools, accessories and materials that you can buy to help make your machine do what you want.
These are all sold separately, and within days of getting my Maker 3, I‘d already splashed a few hundred dollars on extras, some in hindsight were not essential.
What you need will depend on what Cricut machine you have, what you want to do and what materials you’re going to be using.
As I touched upon earlier, the Circuit machines can cut perfectly-sized rolls of vinyl and pre-cut squares of paper, card, and materials that Cricut call Smart Materials. Cricut Smart Materials come in a wide variety of colours, effects & material lengths and are useful for cutting continuous designs.
However, if you are using smaller pieces of material (or non-Cricut materials) then you’ll need a mat.
Cricut mats are sticky mats that hold materials in place as they go through the machine, and, when the cut is complete, they enable you to remove the cut material from the mat. For the Cricut Maker 3 they come in two sizes – 30×30 cm or 30x60m.
The reason you need one is because the movement of the blade and pens can shift material if it’s not securely held down, and in so doing can spoil the cut. When I first started with my Cricut, I used a light grip mat for my first cut of a funky glitter card stock and it wasn’t sticky enough and so I had to re-cut my design. Grrrr.
There are four types of Cricut cutting mats, each colour coded to identify its stickiness and designed to suit different types of material:
- blue – light adhesive good for paper
- green – standard grip for card and vinyl, this is the one I use most
- purple – strong grip for balsa, chipboard and glitter cardboard
- pink – for fabric
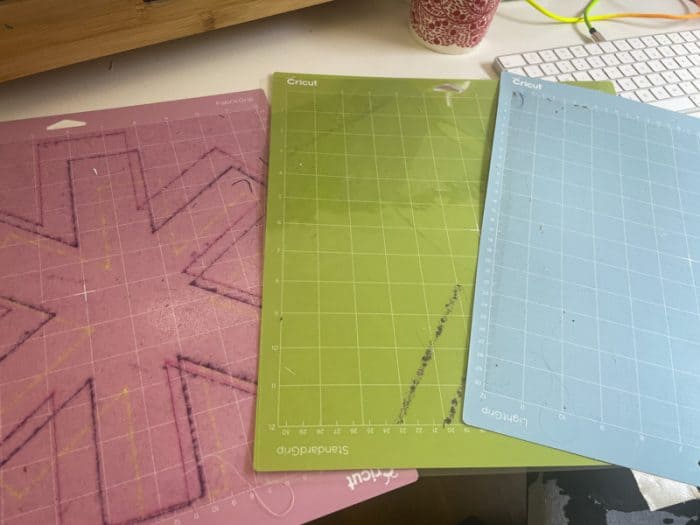
I tried the light grip and found it really only works for paper and so I now tend to use the green standard grip most: for paper, card and vinyl, even glitter cardstock although it fails at super complicated or small cuts. Paper does stick and sometimes tear when you remove it from the green mat, and I should imagine this would be worse for the purple.
There’s also a Cricut Card Mat which holds up to four cards (sold separately of course!) and enables you to print and cut on the front of each card. I loved the idea of this and rushed out and bought one when I first got my machine but found it quite sticky for the lightweight card and it caused them to rip when I tried to remove them. I used some of Cricut’s Pre-cut cards (sold separately!) These have a more matt finish and there was no problem.
The card mat is a great idea if you want to print off multiple copies of the same design – eg invitations, Christmas cards and so on – but my early cards were all one-offs so the card mat wasn’t so useful.
It’s worth noting too, that mats come with a transparent protective plastic sheet which you need to remove before placing your material on top and feeding it into your Circuit machine. Replacing this sheet back on your mat after use helps protect the adhesive layer and extend the life of the mat.
However, after 30-40 uses, the adhesive does tend to decrease in strength. Rather than rushing out to buy new, thanks to YouTube I discovered you can return it to its former sticky form by running it under lukewarm water, scrubbing gently with a hard-bristled plastic brush and letting it air dry.
Who knew I know so much about mats. huh?
The other Cricut essential is a blade, which in the case of the Maker 3 comes as standard – hoorah – and already plumbed into your machine! The blades are encased in a blade housing – a plastic outer – which makes them easy to swap in and out of your machine. The blades can be bought as replacement blades – eg when it is too blunt to use – or within a casing, which costs more.
My comes-as-standard Fine-Point Blade has – so far – sufficed for all my vinyl, card and paper cutting needs and by all accounts should last up to six months.
I was also very keen on road testing the Cricut’s fabric-cutting ability. As a big sewer, I was curious to see how it coped with my fabric-cutting needs, so I also splurged on a Rotary blade designed specifically to cut a range of material / fabrics which was around $80.
I do plan to cut some balsa wood decorations closer to Christmas and realise I will need to buy a Deep Point or Knife Blade but having invested several hundreds of dollars upfront, I decided to be patient as my costs were quickly escalating and my husband was raising his eyes at the growing collection of Cricut stuff.
And of course, there are many more – seven types of blades and three other crafting tools available for the Explore and Maker. These include a Scoring Wheel for light cuts (eg to make folding a card in two easier), a perforation blade, a wavy blade as well as an engraving tip and foil transfer tips.
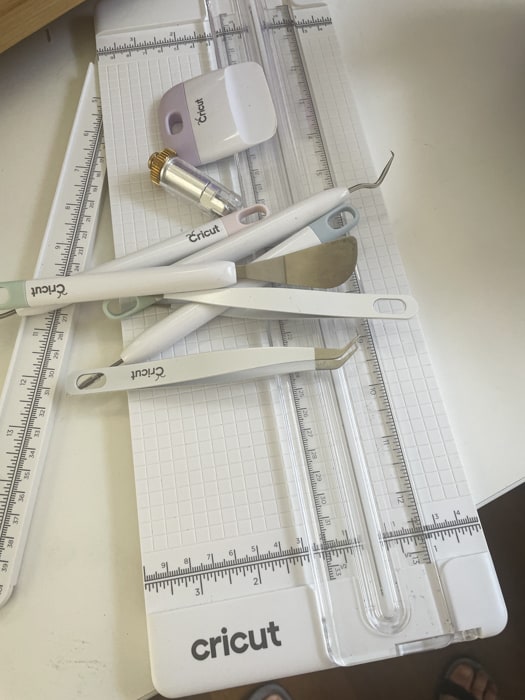
Tools-wise, you can buy lots or nothing. I took a punt at a basic tool kit which is around $30 and got myself a handy bunch of tools to lift, snip, burnish and weed. Cutting on paper, card and vinyl requires a fair amount of fiddling, lifting, moving and separating of materials and these tools – tweezers, spatular, scraper are awesome.
The weeding tool – to weed out the bits you don’t need – is my absolute favourite and now also gets used in sewing, jewellery and woodwork projects.
I also treated myself to a mini guillotine – or a trimmer – which makes it easier to cut lines precisely and which I use to cut materials to put onto the mat. I love its in-built ruler and measuring marks and quite honestly, the satisfaction of using its easy-glide blade system to cut perfectly straight lines every time is something else. Best of all, for a clumsy numpty like me – or for those with kids, it’s foolproof and the blade is tiny and hidden away, so it’s super safe to use.
I’ve just realised too that I can buy a Scoring Stylus – presumably to score down handmade cards so they are easier to bend – but for now, I do it using a small pair nail scissors, so that’s $15 still in the bank and a win for me!
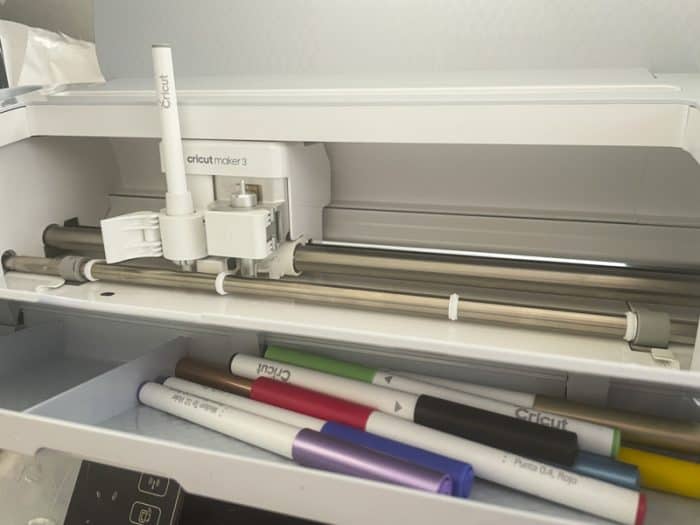
It’s worth mentioning a quick bit about pens. As an added bonus you can load a pen – or pens one by one – into your Cricut so that it can write – rather than print – text, shapes and embellishments. I bought a set of fine-tip coloured pens and a set of thicker metallic ones that are easy to load and produce beautiful results. The range is broad – glitter, gel, watercolour and infusible inks too.
I had to get into the habit of remembering to remove the pen and replace the lid after use to stop it drying up! And not surprisingly it’s the black pen that gets the hardest workout, so I‘ll have to keep an eye on that and gauge how often that needs to be replaced.
What I also love about my Cricut is that it has handy lit up storage area within the front lid – a perfect place for storing pens and other tools.
Cricut also have various heat presses and accessories available for transferring your iron-on designs to caps, t-shirts, bags and other fabrics. These include the high end Autopress machine at $1600+ for high volume reliable heat transfers, the Hat Press Machine ($225), an easy press machine ($280) and the relative budget $130 but teeny EasyPress Mini. You can heat transfer tape and a heat mat too. These heat presses enable a perfectly timed and even heat and avoid mistakes.
Some of these are on my wish list, but for the moment I‘ve been sticking with the more low-tech, old-fashioned household iron, ironing board and baking paper. I’ve had a couple of fails, but largely have nailed the iron-on transfer process and even used some for that work event. Score!
Materials for Cricut machines
Materials are the engine room of the Cricut; without stuff to cut, there’s no project made!
The materials I used in the first weeks with my machine were paper, card, vinyl, iron-ons and cotton fabric.
Cricut has the market wrapped up in these materials – not surprisingly – and teases you with the endless possibilities by supplying you with a test pack with your new machine. Not surprisingly it goes in a nanosecond, and if like me, you’re a stationary fan, then it’s hard to contain your excitement – and your spend on the materials.
Cleverly they also provide a wide range of sample packs – cardstock and vinyls – so you can experiment and work out what works and what you like most.
Card (cardstock in Cricut vernacular) comes in pre-cut (30x30cm) squares – in single and mixed packs, and in a variety of weights, colours and can also be sticker backed.
Vinyl (man-made plastic sticky material) comes in sheets or in rolls – Smart Material – the exact width of the machine cutting palette and can be up to five metres long. It can be both permanent and temporary and also in an iron-on version. You can even buy vinyl that you can print on, although in my experience this is harder to find than the usual vinyl.
If you’re wanting to transfer your vinyl designs to other items – boxes, bottles, walls etc – then you’ll need transfer tape that avoids using your fingers to transfer the designs from vinyl to their intended surface.
Other materials that the machine will cut include thicker stencil material (so you can create designs again and again), pre-cut and folded card sets, foil, labels and paper.
You can also buy pre-made Cricut items to adhere your designs to such as tote bags, mugs, caps, coasters, t-shirts and more!
I started by using the Cricut branded materials – particularly cardboard and vinyl – as I wanted to road-test their products first. But as my confidence and experience increased – and the amount I was spending went up – I also used non-Cricut materials. Card, paper and sticky vinyl is available in a multitude of other retailers and as long as you use the appropriate sticky mat, the results are just as good.
Where can I get Cricut materials?
There’s no shortage of places to get your mitts on Cricut materials in Australia – and although Cricut don’t sell direct from their website like they seem to do in the US, big brands like Spotlight, Officeworks, Harvey Norman, Big W, JB Hifi and Costco all do. Keep an eye out for sales and clearance deals.
Of course, online there’s Amazon and heaps of vinyl supply sellers, too many to mention.
Should I buy a Cricut craft machine?
Whether or not a Cricut is the tool for you is down to your needs and budget.
If you’re an occasional crafter, then realistically a Circuit is not a must-have. Treating yourself to a Circuit Joy might make your crafting more fun and effective, but scissors or a craft knife might suffice.
If however, you’re a maker, a doer, a crafter or a creator, then a Cricut craft machine will revolutionise your creative endeavours. Whether your medium is paper, vinyl or fabric, a Cricut will without a doubt make your projects much faster but way more professional and schmick than you could imagine.
Use a Cricut to supercharge your existing creative business – panel making, custom t-shirts and decals, and greeting cards. Heck with a Circuit you can even start a creative business and make a profit out of your investment.
But if you do end up with this awesome, adaptable, fast and easy-to-use craft machine, whatever you end up using it for and in spite of the cost to set it up and get the gear, a Cricut will undoubtedly make your life a dam sight more fun.
And you may find that, as for me, the love affair just keeps on going.
Thank you, Amy!!
Check out the Australian Cricut website here.
Find a huge and helpful Cricut For Australian Facebook group here.
You might like also to look at photos of what I made using the Cricut Joy machine here.
Hope you found Amy’s extensive article on the Cricut craft machine she tested super helpful! Amy was gifted this machine by Cricut – thank you – all the extra items she bought were paid for by herself.